Showing posts with label recycling. Show all posts

Saturday, September 27, 2014

Tutorial - Toilet Paper Roll Gift Box

Hold on a sec! This empty toilet paper roll that you just threw away? Take it out!
I love recycling and empty toilet paper rolls are a great source for me. You won't believe some of the amazing stuff that you can make from empty toilet paper rolls. Just search it on Pinterest and you'll be amazed, guaranteed!


So today I'm going to show you how to make an adorable gift box from empty toilet paper rolls.


You'll need - 
empty toilet paper rools (Duh!)
decorative paper (I used old newspapers, magazines and books)
gluestick
ribbon
scissors

Use the gluestick to glue the paper around the toilet paper roll.


Leave 0.5" (1.3 cm) of paper on each end.


Add some glue on the inside edge as well and fold the paper inside.


Now comes the tricky part -  press the toilet paper roll in the middle of one end to create a curved crease.

Repeat through all.


Insert your gift, then wrap with ribbon.

This is addictive, folks, I'm warning you. Once you make one, you feel the need to make hundreds more.


So enjoy and don't forget to show me your boxes on The Crafeteria FB page or tag me on Instagram (@thecrafeteria)!

Tuesday, July 30, 2013

Camp Mom - Summer Activities for Kids. Nature Day

Summer vacation to me is like a cute monster. On one hand, it's scary. On the other hand, it's cute and I can't wait to see it up close. I'm now an experienced mother (crazy!), so I already know that the more you plan ahead, the more difficult this vacation will be. But if you don't plan ahead, well, good luck to you!
So some of the days I plan ahead and some I'm just being spontaneous. Those planned days are our Camp Mom days,  and the kids really love them ("Mommy, what are we doing today in Camp Mom?").

First Camp Mom day this year was nature day. Since it's really really hot here, I had no plans to go to "real" nature. Instead we brought nature to our backyard.
We opened the day with a nature scavenger hunt. They had to find things like a big flower, a small flower, twigs, something living (which we didn't touch), something that smells good, something pink and more.

Camp Mom - Summer Activities for Kids. Nature Day

Camp Mom - Summer Activities for Kids. Nature Day


Then we picked flowers in different colors. The goal was to make paint out of flowers. We talked about how people painted before you could just go to a store and buy paint, and we tried to brainstorm methods of paint making. We also added dirt and leaves to our experiment.

Camp Mom - Summer Activities for Kids. Nature Day


Then we crushed everything...

Camp Mom - Summer Activities for Kids. Nature Day

I searched online and found that mixing flowers with egg yolk should work. I thought about trying to cook the flowers, but that would make too much mess, and our house is messy enough as it is, so we didn't cook.
Instead we just mixed the flowers with the egg yolk and even though some didn't work well, some were great and we could actually paint with them!

Camp Mom - Summer Activities for Kids. Nature Day

Now to what I loved most - we made mud soup! We just mixed soil with water and whatever else we could find. The Girl loved dipping her hands inside, The Boy mainly gave us instructions from a safe distance and The Baby wouldn't even go near... And I thought we're going to have a nice family mud bath :)

Camp Mom - Summer Activities for Kids. Nature Day

Camp Mom - Summer Activities for Kids. Nature Day

We used the mud and some twigs we found to make a bird nest.

Camp Mom - Summer Activities for Kids. Nature Day


And if we're going to have birds, they need to eat something. So we took an empty milk carton, cut openings, stuck in a stick (so that the birds can stand) and painted.

Camp Mom - Summer Activities for Kids. Nature Day

Camp Mom - Summer Activities for Kids. Nature Day

After it dried, we filled with birdseed and hung it outside.

Camp Mom - Summer Activities for Kids. Nature Day

At the end of the day, they each got 5 minutes with mommy and daddy's camera (that's really special for them!) and took pictures of nature as they see it. I'll skip the pictures of the house, the cat and all the blurry pictures, and show you just one picture of each.

Him.
Camp Mom - Summer Activities for Kids. Nature Day

Her.
Camp Mom - Summer Activities for Kids. Nature Day


Enjoy the rest of your vacation!

Saturday, July 20, 2013

A Cereal Box Turned Magazine Holder Tutorial


A Cereal Box Turned Magazine Holder Tutorial


One of the best things I've learned in the past few years (mostly thanks to my kids, that bring home from school  these fabulous ideas) is to take something that isn't needed anymore and breathe new life into it. And so, when my cooking books and magazines shelf looked like this...

A Cereal Box Turned Magazine Holder Tutorial


I knew I just had to find a solution to this mess. While I was thinking about it, I saw the cereal box that somehow found its way to this shelf and decided to use the empty boxes laying (for a couple of months already...) in our recycling basket.
But to put the magazines inside the box and call it a day? No way! For once I wasn't lazy... I prepared everything I needed (and a camera!) and began working. To be honest, it's a 10-minutes quick project, even if you add a cup of coffee on the side, so bring the stuff and get going!

Shall we begin?

A Cereal Box Turned Magazine Holder Tutorial
Find a big, narrow box (it doesn't have to be a cereal box), nice fabric (not too heavy, not too lightweight), spray adhesive and scissors

A Cereal Box Turned Magazine Holder Tutorial
Cut the box like that

A Cereal Box Turned Magazine Holder Tutorial
See? Just like that

A Cereal Box Turned Magazine Holder Tutorial
To measure how much fabric you'll need, place the box on the fabric and wrap around. Leave 1.5-2 cm (0.6"- 0.8") hangover.

A Cereal Box Turned Magazine Holder Tutorial
We'll begin with the narrow tall side. This will be the back of the box.

A Cereal Box Turned Magazine Holder Tutorial
Shake the bottle well, spray adhesive from 20-30 cm (8"-12") distance on wrong side of the fabric and on the box, wait 10 seconds and carefully apply fabric onto box. If wrinkles are created, lift fabric and apply again.


A Cereal Box Turned Magazine Holder Tutorial
Paste the fabric onto all sides of the box from the outside, except for the bottom

A Cereal Box Turned Magazine Holder Tutorial
When you get to the narrow tall side again (where we began working), fold in the edge of the fabric, to keep things clean, and then apply.

A Cereal Box Turned Magazine Holder Tutorial
Now spray adhesive on the bottom of the box as well and apply fabric, then paste the edges of the fabric onto the inside of the box. That's how it looks now.

A Cereal Box Turned Magazine Holder Tutorial
Now it's all nice and organized! You can also use it to hold kids activity books or magazines for the bathroom or you can even use it at the office.


Wednesday, July 17, 2013

Day 17. Now It's Your Turn!

Wednesday is here, and it's time again to check out what you've been up to lately.


Now it's your turn!

Remember? You pin your pictures to the Pinterest Group Board, get views from hundreds of followers and maybe even get to be featured here next week.

How to pin your photos to the group board?

1. Follow me on Pinterest
2. Leave a comment, here or on any of my Pinterest pins, with your Pinterest user name.
3. I'll follow you back
4. I'll send you an invite
5. Accept the invite
6. Start pinning!

Begginers, here's a detailed explanation:
- You have to follow me on Pinterest (and I have to follow you), because these are Pinterest's rules for group boards. If the board admin wants to invite people to the pin to the board, they have to follow each other. You can only follow one of my boards, btw.
- You don't have to be bloggers. As long as your pictures are somewhere around the WWW, you're good. Flickr, Picasaweb, Instagram etc. are all fine.
- Your pin doesn't have to be a tutorial. As long as it can be an inspiration to someone, that's fine.
- If you have a non-English blog, that's OK. These days, with Google Translate, we can just translate the page to another language.

All right then, shall we see today's features?

Let's start with a fellow Israeli, Stav from Shlishkalach. She made ah-mazing papier mache' chicken. Her blog, by the way, is really awsome. Lots of beautiful scrap and papier mache' works.


Papier Mache' Chicken
Papier Mache' Chicken From Shlishkalach

Allie from The Random Crafter with an easy tutorial for a burlap wreath, love it!


Burlap Wreath Tutorial
Burlap Wreath Tutorial From The Random Crafter


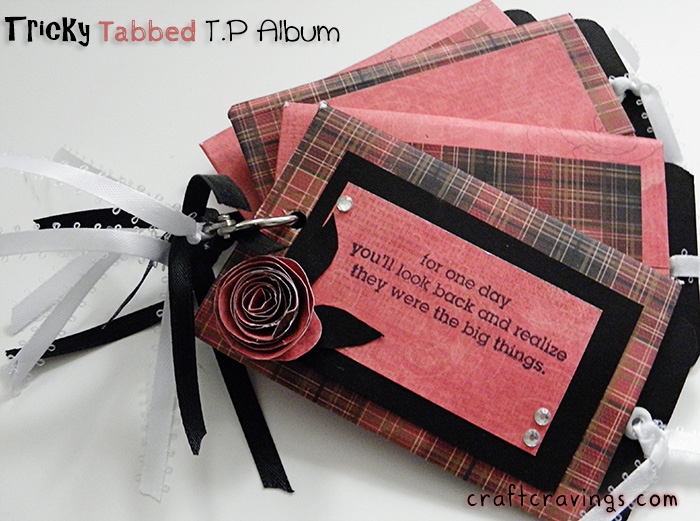
Look at this beautiful Tricky Tabbed TP Album from Craft Cravings. Can you believe it is made of... toilet paper rolls?!


Tricky Tabbed TP Album
Tricky Tabbed TP Album by Craft Cravings


If you were featured, feel free to grab a button!


The Crafeteria


That's it for today, now go and pin your best works into the board!

Monday, July 15, 2013

Day 14. Cardboard Cabinet (or: sometimes you need to know how to screw up!)

Ever since the day I first found out about the magical world of building with cardboard (remember the cardboard puppet theatre that I posted hundreds of years ago?), I really wanted to build a small cabinet for the kids play room or for my craft room. So I did. It took me something like three years, but I did. The problem with these kinds of projects is that they cause a massive mess, so the kids have to be asleep. Meaning I can only start working around 8:30 pm (which also means really bad pictures for you. sorry :) ). That reduces the number of days I actually find the energy to work, so what was supposed to be a 4-5 hours work takes 3 years to finish, but that's just me :)

Anyway, building with carboard technique isn't that complicated. You need to first build a framework, that is actually a crisscross of cardboard sheets, and then cover it with more cardboard. Unfortunately, I didn't write a complete tutorial for that cabinet (come on, I hardly finished it as it is!), but you can find many of these on the WWW, just google it.

After lots of scribbles and sketches I decided to make a wheeled 3 compartment cabinet.

Step one was building the framework.

Buiding a Cardboard Cabinet


Buiding a Cardboard Cabinet


Then I covered the framework with more cardboard sheets


Buiding a Cardboard Cabinet

Buiding a Cardboard Cabinet


Framework is ready!

Buiding a Cardboard Cabinet


Now we use gummed paper on all edges to smoothen things up.

Buiding a Cardboard Cabinet


On the next step I used wallpaper paste to paste simple brown packing paper all over the cabinet. The idea is to strengthen the furniture and to make everything look smooth and clean. Guess what? I can't find any photos of this step. You'll have to use your imagination...

After it dried, it was time to paint and apply lacquer. I actually don't like how the colors came out, but at this point I was so exhausted from the whole thing and I just wanted to get over with it, so I left it that way.

It all sounds pretty simple, isn't it? So why did it take me so long to finish it?!

Buiding a Cardboard Cabinet


As you can see, something was wrong with my framework design, or maybe I should have added wheels also on the compartment in the middle as well, because it got this funny 'belly', from the weight of all the fabric (did I mention screwing up?...). And as you can also see, somewhere in the middle of the process I just couldn't care less anymore, so the brown paper cover is all wrinkled... Maybe I was hoping it'll get fixed by itself. Well, it didn't... :)

So I know, that is not exactly what I had in mind, and I know, it took me 3 years to finish, but it is a cardboard furniture and I built it, and I like it even with all its flaws :) Can't promise I'll build another cardboard furniture anytime soon, but I just saw this kids cardboard bed shaped like a racecar, Big Boy would love it!

Tuesday, July 2, 2013

Day 2 - Let's Talk About Me For a Minute

Second Day to the Ultimate Blog Challenge. What was I thinking when I signed up?... Argggg... Take a deep breath... OK, let's continue.
I've been wanting to write an "About Me" section for a while now, but other things kept on coming up instead. So a-post-a-day challenge is definitely a good excuse for that.

I'm Tal, 30+ years old if you check my ID, a lot less if you ask me. A mother to three little (and cute!) ones, ages 1-7. We live in a small village not far from Tel Aviv, Israel's cultural capital (and one of my favorite cities in the world!). We moved here about 3 years ago, after 8 years in the Far East (Taiwan & China).

I always loved art and crafts, but never tried to do anything related, and to be honest, I never thought I was good at it.
Things started to change 7 years ago, when The Boy was born and I found myself spending hours at home, getting BORED. Somehow, I'm still not sure exactly how, I began working with polymer clay (aka Fimo). I wrote a post about it a couple of years ago, when I was writing a post a month and not a post a day...

Polymer Clay Pendant


That was also when I realized that I can make some money out of it, when I participated in a charity fair and to my surprise sold most of the items I brought with me.
Fast forward a few years, I just love all kind of crafts. The Man can't look anymore at the piles of cardboard boxes / two-legs-tables / old and torn t-shirts and other things that I hoard almost obsessively. But ever since I started, I just can't stop...

Children Play Kitchen
Old cupboard turns play kitchen

Cardboard Puppet Theater
A big cardboard box turns puppet theater

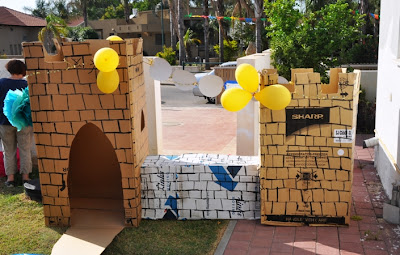
Cardboard Box Castle
Or a castle for princes and princesses birthday party

Plastic Bag Applique
And a plastic bag upcycles a simple tank top

Except that, I also enjoy sewing, crocheting, working with clay, cooking, felting and have some fun with the kids, of course.


So I'd love you to join me on this one month challenge (I'd be happy if you stick around after that as well, of course!). Comments, notes, suggestions etc. are always greatly appreciated. You can also join me on Facebook, Twitter, Pinterest (don't forget to pin your images to the group board!), Google+, Instagram, Bloglovin' and soon on Etsy as well.