I'm so excited, I love Someday Crafts and I'm guest posting there today! Come and check out my easy Fabric Covered Decorative Letters Tutorial!
Monday, September 30, 2013
Saturday, September 28, 2013
Guest Post - The Paper Vine. DIY Key Chain Tutorial

Hello, The Crafeteria Readers! My name is Michelle, and I write a DIY/Memory Keeping Blog over at The Paper Vine. I'm excited to start the weekend by sharing a fun, quick, and easy project with you all! Today we are going to be creating a DIY Key Chain. The process is very simple and doesn't take much time at all - perfect for a rainy afternoon or last minute gift! Let's get to it, shall we?

Here are all the materials you will need: - Thin Chipboard - Mod Podge - Sponge Brush - Key Ring - Two Designs (2" square) - Scissors - 3 hole punch
1. Size, Cut, Decorate Decide the size of your key chain. A typical size is 2"x2", but you can make it any size you'd like. Measure and cut the chipboard and pictures or paper. I was making several, so I used pictures for some, bible verses for some, and decorative paper for the rest! Scrapbook paper as well as wrapping paper are great items to use! The pictures and verses didn't need any extra decoration. However, on the scrapbook paper I added a monogram in the middle.

2. Glue Glue your design to the chipboard. After it dries, paint a thin layer of Mod Podge on top of your picture. Make sure the coat is even! This top layer acts as a protectant to the design, and helps the key chain to last longer. Let dry for 15 minutes. Use your second design and repeat the process on the back of the chipboard.

3. Punch Holes Using a 3 hole punch, punch one hole along the top and in the center. Be careful to make sure your hole is far enough down that it doesn't get cut off by the edge of the chipboard!

4. Attach & Share Attach your key ring to your new key chain! Wasn't that easy? You now have an adorable, personalized key chain for you or for someone you love!

These Key Chains would make precious gifts for family members or even a perfect addition to care packages and gift baskets! If you're already thinking about Christmas, these would make great stocking stuffers! My favorite use is to add the key chain as a decoration to a gift package! Thanks for reading, and I've enjoy spending my Saturday morning with you! Michelle
Friday, September 27, 2013
My TaoBao Order - This is How It Looks
I've already told you how much I love Taobao, now it's time to show you why. My dear brother, who lives in China, came for a visit and brought with him a wonder-suitcase, just for me. What did I have there?
And these are for the kitchen (come on, don't you find yourself sometimes wishing you had a star shape egg mold? Hello Kitty ice cube tray? A banana case?).
And for my craft room - some fabrics, beutiful iron-on fabric stickers, threads, stamps, lace stickers, books and more....
And of course some washi tapes, fabric tapes and lace tapes, just in case :)....
Remember my Chinglish post from not so long ago? Well, now I've got some more for you, coming from the toys packages...
 |
That's a large Chinese paper lantern. XuYuan, by the way, is NOT a person, but a verb meaning 'make a wish'
|
But the best one is definitely that one, the kids xylophone. Please let your child be knocking to attack the xylophone...
Wednesday, September 25, 2013
Now It's Your Turn - The Crafeteria's Weekly Pinterest Party
I know, I know, we missed 2 weeks of our Pinterest Party. Will you believe me when I tell you the last few weeks have been REALLY crazy? It's the holidays season here in Israel, and that means no school, family gathering and basically - no time for me to breathe. So I'm sorry again, but hey, at least I made it today!
Now, to the party!
Remember? You pin your pictures to the Pinterest Group Board, get views from hundreds of followers and maybe even get to be featured here next week.
How to pin your photos to the group board?
1. Follow me on Pinterest
2. Leave a comment, here or on any of my Pinterest pins, with your Pinterest user name.
3. I'll follow you back
4. I'll send you an invite
5. Accept the invite
6. Start pinning!
Begginers, here's a detailed explanation:
- You have to follow me on Pinterest (and I have to follow you), because these are Pinterest's rules for group boards. If the board admin wants to invite people to the pin to the board, they have to follow each other. You can only follow one of my boards, btw.
- You don't have to be bloggers. As long as your pictures are somewhere around the WWW, you're good. Flickr, Picasaweb, Instagram etc. are all fine.
- Your pin doesn't have to be a tutorial. As long as it can be an inspiration to someone, that's fine.
- If you have a non-English blog, that's OK. These days, with Google Translate, we can just translate the page to another language.
All right then, shall we see today's features?
I love wreaths. Unfortunately, they're not so popular in Israel, but I'm planning on making some anyhow. This pinecone wreath from The Shady Porch is so beautiful and also looks pretty easy to make.
Rebecca from Hugs are Fun! made this lovely color matching wheel game for the little ones. I immediately added it to my got-to-make-this-for-my-kids! list (this list is just getting longer every day...).
And Heather from Craft Craving can teach you how to make this super easy headband. If you can sew, you can make one. On second thought, why one? Make twenty! Oh well, here's another one for my got-to-make-this-for-my-kids! list...
Thanks for sharing ladies, if you were featured, feel free to grab a button!
That's it for today, don't forget to pin your best works into the board!
Now, to the party!
Remember? You pin your pictures to the Pinterest Group Board, get views from hundreds of followers and maybe even get to be featured here next week.
How to pin your photos to the group board?
2. Leave a comment, here or on any of my Pinterest pins, with your Pinterest user name.
3. I'll follow you back
4. I'll send you an invite
5. Accept the invite
6. Start pinning!
Begginers, here's a detailed explanation:
- You have to follow me on Pinterest (and I have to follow you), because these are Pinterest's rules for group boards. If the board admin wants to invite people to the pin to the board, they have to follow each other. You can only follow one of my boards, btw.
- You don't have to be bloggers. As long as your pictures are somewhere around the WWW, you're good. Flickr, Picasaweb, Instagram etc. are all fine.
- Your pin doesn't have to be a tutorial. As long as it can be an inspiration to someone, that's fine.
- If you have a non-English blog, that's OK. These days, with Google Translate, we can just translate the page to another language.
All right then, shall we see today's features?
I love wreaths. Unfortunately, they're not so popular in Israel, but I'm planning on making some anyhow. This pinecone wreath from The Shady Porch is so beautiful and also looks pretty easy to make.
Rebecca from Hugs are Fun! made this lovely color matching wheel game for the little ones. I immediately added it to my got-to-make-this-for-my-kids! list (this list is just getting longer every day...).
And Heather from Craft Craving can teach you how to make this super easy headband. If you can sew, you can make one. On second thought, why one? Make twenty! Oh well, here's another one for my got-to-make-this-for-my-kids! list...
Thanks for sharing ladies, if you were featured, feel free to grab a button!
That's it for today, don't forget to pin your best works into the board!
Labels:
Craft Cravings,
Hugs are Fun,
pinterest,
The Shady Porch
Tuesday, September 24, 2013
A Shop a Week
It's the second week and the search for online shops just becomes more and more fun. I recieved a lot of links for amazing shops, I promise I'll get to all of them at some point. I remind you to email me (or just comment) links to great shops you know (feel free to send a link to your own shop!).
Meanwhile, let's move on to today's shop. It's also an Etsy shop, ZanaProducts, a shop by a mother and daughter from South Africa, that offers fabric items, mostly pillows, but some tote bags and fabrics as well. All the products are beautiful and have a neat look. I really like the pillows for him and her. I think they can make a lovely anniversary gift. Want to see?
I've been sitting here for an hour or so, trying to decide which one I like best. Can't make up my mind... Which one is your favorite?
Saturday, September 21, 2013
Guest Post - Small Apartments in the Big City
Today on The Crafeteria please welcome Yonit, an interior design from the Israeli blog Small Apartments in the Big City. Yonit and her photographer, Avivit, designed, renovated, upgraded and basically just completely renewed Neta's (Avivit's daughter) room. Look how pretty it turned out (and if you want to guest post on The Crafeteria, please email me!) -
---------------------------------------------------------------------------------------------------------------------------
Hi all!
When Avivit, my photographer, talked to me about Neta's (her daughter) room, I immediately accepted the challenge. Avivit is so creative, she always has these cool ideas for locations and shooting angles. Neta, her 4 year old daughter, is also special herself. Totally adorable. And add to all that Omer, their man, who is a great handyman. Well, What is there to talk about? Off we go!
So here's where we started it all: a room packed with furniture, toys, decorations and a lot of mess.
Before you begin re-designing a room, you have to organize it first. Each family usually has someone that hoards and someone that throws. I won't tell you who is which in this family, but let's just say that they all were very efficient and managed together to cut in half (!) the stuff in the room. The things we kept we placed in a big closet and a shelving unit with boxes and changed Neta's bed to a big girl's bed.
On the wall, like in painting, we also needed a clean, white canvas to work on. So we removed the wall decals and painted the room white.
We wandered around in the fabric streets of Tel Aviv and bought some fabrics we liked. Later on we made from them a bed cover, pillows and curtains, with the help of Daniel Gur Schwartz, and Omer helped with the last stitches. In Tel Aviv we also found some wall paper leftovers and used them to make a wall border with a ruler and an X-Acto knife.
We also found out that in this family the cobbler's shoes are never fixed - Neta has so many beautiful photos and no photo album! So we decided to fix that - we sprayed paint on Ikea frames and hung three pictures of her on the wall. We also added a rug and... that's it, here's how it looks now:
Neta was happy to help with the accessories...

Designing Neta's room became a family experience, in which each one contributed his talents and abilities. We had a great time and hope you also like the result :)
My Facebook page is Yonit Stern - Designing Little Apartments in the Big City.
Thank you so much for having me on The Crafeteria! It is definitely the place to get more inspiration...
Friday, September 20, 2013
Come Visit Me...
I'm over at one of my favorite blogs (that has one of the cutest names ever) today , Sumo's Sweet Stuff. Come visit me there (and stay for a while, because it is really a great blog).
Tuesday, September 17, 2013
A Shop a Week
Since I began listing items in my Etsy shop, I find myself drawn to other shops and I'm constantly virtually window shopping through vintage items, pretty fabrics, products for kids and all the other special items that only a website like Etsy can offer.
Then I thought, why do I keep to myself all these beautiful shops? Why should only my Online Shopping folder be so full? And I'm not talking only about Etsy. There are so many gorgeous little shops around the world and with the current globalization situation, it only becomes easier and cheaper to order from them.
So I decided to share them with you - every week I'll feature here another shop and some of the items it has on stock. If you have any favorite shops, please link them in a comment or email me (feel free to link your own shop!).
And to the first shop...
I'm not going to be objective about this one, as I decided to open this series with no other than my mom's new shop, Srooga. In the last year my mom finally realized how talented she is and started crocheting, mostly using t-shirt yarn, bags, baskets and rugs. If you have any questions or if you want to custom order, you can contact her directly.
Saturday, September 14, 2013
Guest Blogger - At the Lake. French Toast Casserole
My friend Regina from At the Lake is here today with a recipe that I just have to try for a French Toast Casserole. Enjoy!
(and if you want to guest post too, please email me!)
-------------------------------------------------------------------------------------------------------
Hi everyone. I am Regina from At the Lake. I am so excited to be here with you and share one of my favorite recipes. My husband and I have the marvelous good fortune to live in and operate a Bed and Breakfast on an amazing piece of property on the banks of Lake Bridgeport in Texas.
It is really important to me that our breakfast offerings include some things that you don’t get at home every day. So, our menu includes things like Danish Aebleskivers which are a ball shaped pancake, homemade syrups including a Caramel syrup, berry syrups and a peanut butter syrup.
But the real specialty of the house is our baked French Toast Casserole. I first came across this recipe (I think it was on allrecipes.com) about 4 years ago. Every year we have friends and family over for Christmas breakfast. It is an opportunity to share that special day with those who are near and dear to us and who may not have family around that they can spend the day with. I first served this casserole for one of those Christmas breakfasts. It was a huge hit.
We get more requests for this than for anything else on the menu, especially after someone has seen the reviews online from other guests.
So, sit back, relax and enjoy as I share our Baked French Toast Casserole. This makes a 9 x 13 size casserole.
Ingredients:
1 (1 pound) loaf of French Bread, cut into ½ inch cubes
8 eggs
2 cups milk
1 ½ cups half and half cream
2 teaspoons vanilla extract
¼ teaspoon ground cinnamon
Topping:
¾ cup butter
1 1/3 cups brown sugar
3 Tablespoons light corn syrup
The night before:
I like to take a fork and push down any pieces of bread that might not be immersed in the liquid. I want each piece to soak in this deliciousness.
Cover the dish with plastic wrap or tin foil (I prefer the plastic wrap) and place in the refrigerator overnight.
When you remove it from the oven, it will have puffed up, but as it cools, it tends to go down a bit.
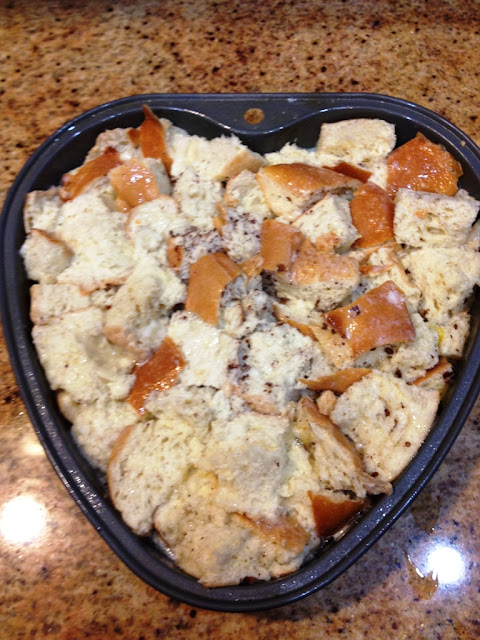
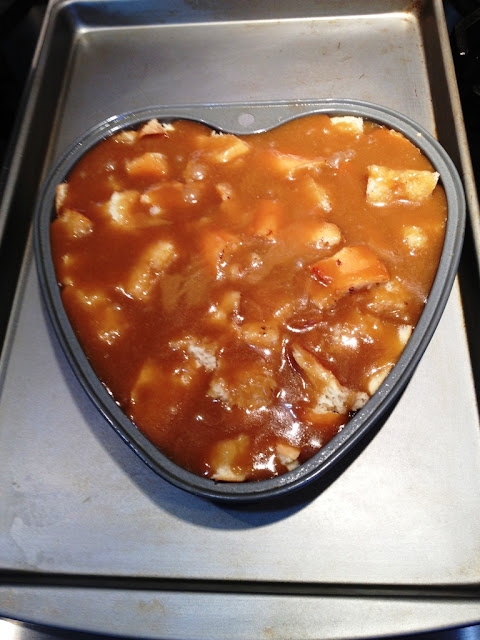
Sometimes we only have 2 guests for breakfasts and a 9 x 13 is too much. However, I will say that it reheats amazingly in the microwave. But, for those days that I don’t need that much, I have reduced the recipe so that I can make a single serving or a casserole for 2 (actually, much more than 2 can eat). When I have couples, I usually make it in my heart shaped pan.
This is good enough that you don’t have to put anything on it. However, you can add syrup, butter, or both. Many of our guests like to try it with one of our homemade syrups, such as Buttermilk Caramel Syrup (borrowed from Kara at Kara’s Creations). Another popular syrup is our strawberry or raspberry syrup, depending upon which fruit I have on hand.
I hope you enjoyed the recipe. It is certainly a favorite at our house and quickly becomes a favorite for anyone that tries it.
Let me know how you like it and what your favorite topping is, if you choose to put a topping on it.
Thanks again for visiting with me today. And thank you Tal for having me as a guest on your blog.
(and if you want to guest post too, please email me!)
-------------------------------------------------------------------------------------------------------
Hi everyone. I am Regina from At the Lake. I am so excited to be here with you and share one of my favorite recipes. My husband and I have the marvelous good fortune to live in and operate a Bed and Breakfast on an amazing piece of property on the banks of Lake Bridgeport in Texas.
It is really important to me that our breakfast offerings include some things that you don’t get at home every day. So, our menu includes things like Danish Aebleskivers which are a ball shaped pancake, homemade syrups including a Caramel syrup, berry syrups and a peanut butter syrup.
But the real specialty of the house is our baked French Toast Casserole. I first came across this recipe (I think it was on allrecipes.com) about 4 years ago. Every year we have friends and family over for Christmas breakfast. It is an opportunity to share that special day with those who are near and dear to us and who may not have family around that they can spend the day with. I first served this casserole for one of those Christmas breakfasts. It was a huge hit.
We get more requests for this than for anything else on the menu, especially after someone has seen the reviews online from other guests.
So, sit back, relax and enjoy as I share our Baked French Toast Casserole. This makes a 9 x 13 size casserole.
Ingredients:
1 (1 pound) loaf of French Bread, cut into ½ inch cubes
8 eggs
2 cups milk
1 ½ cups half and half cream
2 teaspoons vanilla extract
¼ teaspoon ground cinnamon
Topping:
¾ cup butter
1 1/3 cups brown sugar
3 Tablespoons light corn syrup
The night before:
- Place the bread cubes in a 9 x 13 glass baking dish that has been coated with butter or a non-stick cooking spray. In a large bowl, beat together the eggs, milk, cream, vanilla and cinnamon. Pour the egg/milk solution over the bread cubes.
I like to take a fork and push down any pieces of bread that might not be immersed in the liquid. I want each piece to soak in this deliciousness.
Cover the dish with plastic wrap or tin foil (I prefer the plastic wrap) and place in the refrigerator overnight.
- In the morning, preheat the oven to 350 degrees F (175 degrees C). Remove the casserole from the refrigerator and let it sit at room temperature for 30 minutes.
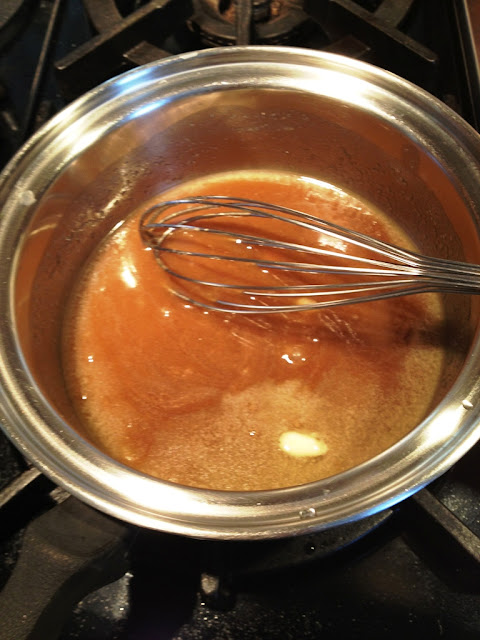
- In a small sauce pan, combine the butter, brown sugar and corn syrup. Heat it until it is bubbling. Pour it over the bread / egg mixture. Again, I like to make sure that the entire top is covered with this caramel mixture. So, pour it on slowly and work at covering all of the bread.
- Bake it in the preheated oven, uncovered, for 40 minutes. I strongly recommend that you place a baking sheet under it as it tends to overflow as it cooks. The pan will wash up very easily, but, if you wanted, you could cover it with tin foil.
When you remove it from the oven, it will have puffed up, but as it cools, it tends to go down a bit.
Sometimes we only have 2 guests for breakfasts and a 9 x 13 is too much. However, I will say that it reheats amazingly in the microwave. But, for those days that I don’t need that much, I have reduced the recipe so that I can make a single serving or a casserole for 2 (actually, much more than 2 can eat). When I have couples, I usually make it in my heart shaped pan.
This is good enough that you don’t have to put anything on it. However, you can add syrup, butter, or both. Many of our guests like to try it with one of our homemade syrups, such as Buttermilk Caramel Syrup (borrowed from Kara at Kara’s Creations). Another popular syrup is our strawberry or raspberry syrup, depending upon which fruit I have on hand.
I hope you enjoyed the recipe. It is certainly a favorite at our house and quickly becomes a favorite for anyone that tries it.
Let me know how you like it and what your favorite topping is, if you choose to put a topping on it.
Thanks again for visiting with me today. And thank you Tal for having me as a guest on your blog.
Subscribe to:
Comments (Atom)


