Showing posts with label upcycling. Show all posts

Sunday, July 14, 2013

Fabric Covered Binder Tutorial (a nice packaging to your blog planner)

When I went to the store to buy a binder, I didn't like any of the binders they had, so I decided to upcycle one myself. I took a simple binder and covered it with fabric. This is an example for an easy-peasy upcycling that will take you 5 minutes to make, but create a WOW! change.

Fabric Covered Binder Tutorial


This is how you will make one yourself:

Fabric Covered Binder Tutorial
Materials: a simple binder, fabric (you can use 2 different pieces. One for the inside and one for the outside of the binder),  spray adhesive, scissors

Fabric Covered Binder Tutorial
Place the binder on the fabric that you're using for the outside. Leave 5 cm (around 2") hangover and cut

Fabric Covered Binder Tutorial
Spray adhesive from 20-30 cm (8"-12") distance on wrong side of the fabric and on outside of binder and carefully apply fabric onto binder. Start with one side, then move to the center (the narrow part) and only then to the other side (apply other side when binder is closed). If you have wrinkles, lift fabric and apply again

Fabric Covered Binder Tutorial
Move on to the inside of the binder. Fold in the sides edges, spray adhesive and apply

Fabric Covered Binder Tutorial
That's how it looks now

Fabric Covered Binder Tutorial
To paste the top and bottom edges, cut 2 vertical stripes in the hangover fabric in the center (the narrow part) and fold a triange in the corner

Fabric Covered Binder Tutorial
Fold in edges, spray adhesive and apply to the inside

Fabric Covered Binder Tutorial
Now to the inside. Cut the other piece of fabric to size (leave 1-2cm / 0.4"-0.8" hangover)


Fabric Covered Binder Tutorial
In the center, where the rings are, cut 2 small slits and thread the rings

Fabric Covered Binder Tutorial
Fold in the edges towards the wrong side. You can press or paste first, but if you're like me, just use your finger :)
Fabric Covered Binder Tutorial
Spray adhesive like you did on the outside and apply
Fabric Covered Binder Tutorial


That's it, done! Easy and fun. And when people ask you "where did you buy this?!", you can always reply with "oh, this? I made it. It was nothing. Took me exactly 5 minutes...".

Fabric Covered Binder Tutorial


I used this binder for my blog planner. If you also need a blog planner, just subscribe to The Crafeteria's newsletter and you'll receive one to your inbox within 24 hours.

Tuesday, July 2, 2013

Day 2 - Let's Talk About Me For a Minute

Second Day to the Ultimate Blog Challenge. What was I thinking when I signed up?... Argggg... Take a deep breath... OK, let's continue.
I've been wanting to write an "About Me" section for a while now, but other things kept on coming up instead. So a-post-a-day challenge is definitely a good excuse for that.

I'm Tal, 30+ years old if you check my ID, a lot less if you ask me. A mother to three little (and cute!) ones, ages 1-7. We live in a small village not far from Tel Aviv, Israel's cultural capital (and one of my favorite cities in the world!). We moved here about 3 years ago, after 8 years in the Far East (Taiwan & China).

I always loved art and crafts, but never tried to do anything related, and to be honest, I never thought I was good at it.
Things started to change 7 years ago, when The Boy was born and I found myself spending hours at home, getting BORED. Somehow, I'm still not sure exactly how, I began working with polymer clay (aka Fimo). I wrote a post about it a couple of years ago, when I was writing a post a month and not a post a day...

Polymer Clay Pendant


That was also when I realized that I can make some money out of it, when I participated in a charity fair and to my surprise sold most of the items I brought with me.
Fast forward a few years, I just love all kind of crafts. The Man can't look anymore at the piles of cardboard boxes / two-legs-tables / old and torn t-shirts and other things that I hoard almost obsessively. But ever since I started, I just can't stop...

Children Play Kitchen
Old cupboard turns play kitchen

Cardboard Puppet Theater
A big cardboard box turns puppet theater

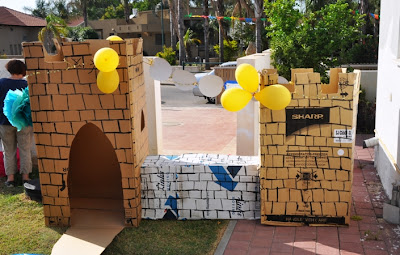
Cardboard Box Castle
Or a castle for princes and princesses birthday party

Plastic Bag Applique
And a plastic bag upcycles a simple tank top

Except that, I also enjoy sewing, crocheting, working with clay, cooking, felting and have some fun with the kids, of course.


So I'd love you to join me on this one month challenge (I'd be happy if you stick around after that as well, of course!). Comments, notes, suggestions etc. are always greatly appreciated. You can also join me on Facebook, Twitter, Pinterest (don't forget to pin your images to the group board!), Google+, Instagram, Bloglovin' and soon on Etsy as well.

Tuesday, June 4, 2013

Stylish T-Shirts in 15 minutes (plus free applique patterns!)

With the first heat wave, I realized that the time has come again. You know, when you realize (yet again) that kids grow fast. Really fast. Every season we need to change their whole wardrobe, and with three kids now, it's not becoming any easier (or cheaper). So we headed to the store to find out (again!) that prices in Israel today are just crazy. A simple printed t-shirt goes for the equivalent of 13.5 US$, kind of crazy, don't you think?
So we decided that in order to be able to buy clothed for the three of them and still have money to buy food for next week, we're going to have to compromise. So we got plain t-shirts that were on sale - five shirts for 100 Shekels (that's around 27 US$).
But plain t-shirts are just that. Plain. Which I think is a bit boring. So I decided to upcycle them. Fifteen minutes work on each shirt got us the perfect shirts for the kids, and we still had some money left to buy pizza...

How?
That's how:

You'll need 
Shirt (dah!)
Fabric scraps
Heat'n Bond Lite
Iron
Sewing Machine


Applique Tutorial (plus free applique patterns) @ The Crafeteria


Draw or download an applique pattern. Feel free to use this file, that I prepared, with a few patterns that can upgrade any shirt. Scroll down to see some examples.

Cut your pattern, pin to a piece of Heat 'n Bond and to the fabric scrap.
Applique Tutorial (plus free applique patterns) @ The Crafeteria
Before cutting it...
Applique Tutorial (plus free applique patterns) @ The Crafeteria
And after...

We're done with the pattern. I recommend saving it in a sheet protector, so that you can easily use it again when needed.
Now place the piece of fabric on the Heat 'n Bond and then place on the shirt, where you want the applique to be.
Hold your iron down, without moving it, for a few seconds. Make sure it's all sealed.

Applique Tutorial (plus free applique patterns) @ The Crafeteria


Now let's sew. Why? Because you don't want to end up with a shirt looking like this -
Applique Tutorial (plus free applique patterns) @ The Crafeteria

This is what happened to me last time, when I made a few shirts and just forgot to sew this one... After the first washing, it came out like this...

So we sew.
Set your machine to zigzag stitch, you want the stitch lenght to be very short, almost like the lenght for buttonholes. Try first on a scrap, to make sure you like the result. When you're ready, just sew, slowly and carefully, especially on curves.
I like to sew using threads in bold colors, because I feel it makes the applique really stand out, but it's up to you, of course, and you can choose to use threads the same color as the shirt or applique.

Applique Tutorial (plus free applique patterns) @ The Crafeteria

That's it!
It was 15 minutes, no?

Applique Tutorial (plus free applique patterns) @ The Crafeteria

Here are some other shirt I made. You can find the patterns for all of them (and a few more) in this file.

Applique Tutorial (plus free applique patterns) @ The Crafeteria

Applique Tutorial (plus free applique patterns) @ The Crafeteria

Applique Tutorial (plus free applique patterns) @ The Crafeteria

Applique Tutorial (plus free applique patterns) @ The Crafeteria


These items from Amazon will help you get started:


-----------------------------------------------------------------------------------------------------
Follow me